Monster Hunter Tri Guides: Everything You Need to Know About Agnaktor
Aug 05, 2011 // Snow
Our second article written by one of the many Monster Hunters here on Capcom-Unity is a great look at the Agnaktor. If you’re looking for the basics on what to attack, where to attack, and what to expect, take a look here.
Our second entry comes from Randy . He’s done tons of research and data mining so you don’t have to!
_____________________________
Fellow hunters, I am here to pass on some wonderful knowledge to not only beginners, but for even the experienced. I will detail information from the most common to even the lesser known details about this wonderful species known as the Agnaktor.
I’m sure the most, if not all of you, can recognize this:
 “ Also known as Fire-Pike Wyverns, Agnaktor use their tough snout and great strength to burrow through rocks and sometimes even the cave ceilings. It is encrusted with hardened lava that can be softened from the heat when they spit magma or burrow. ”
This is the in-game description that can be found in your Hunter’s Notes after targeting the Agnaktor with your Wii-mote to receive his information. With this description alone, we can infer several things about the Agnaktor. We can see how the he earns the name “fire-pike,” as a pike is a type of fish. The term “Crimson Armor” comes from the fact that the lava stuck to his body upon leaving the lava rivers can harden and create a very dense armor that even the sharpest weapons cannot penetrate. While playing online, you may notice him referred to as just “Agna.”
Ecology and Adaptations:
Before getting into battle tactics, let’s analyze its behavior and ecology. In Monster Hunter Tri, the Agnaktor can be found exclusively in the Volcano with its younger forms known as Uroktors. The Agnaktor is classified as a Leviathan, meaning it has a close relation to the Lagiacrus and Royal Ludroth, however it does not live in water. It is highly adapted to live in the Volcano due to its highly fire resistant body and tough snout to break through the magma rocks. He can be found in the following size ranges:
The Agnaktor is able to swim at unbelievable speeds through the lava and even through the volcanic rocks thanks to its mighty beak. These two specific adaptations allow it to launch out from under weary hunters and burrow through ceilings. It also has a signature heat beam very similar to that of the Gravios. Before releasing this heat beam, the Agnaktor snaps its beak quickly several times to create a spark, warning hunters or other enemy monsters that the beam is on its way. The Aganktor can also produce this beam while partially underground.
The lava found on its body can solidify as I mentioned earlier to create armor-like plating. Once hardened, even purple sharpness will bounce right off. However, the armor can easily be softened by coming in contact with the lava. The Agnaktor does this in several ways himself. Every time the Agnaktor burrows through volcanic rock, he comes in contact with the lava and softens his armor. When firing his heat beam, his beak and chest become soft. This suggests that the mechanism that allows him to use the beam must start in his chest. When he uses his beak to strike the ground, his beak softens due to the lava. Another very useful and tactical way to soften his armor is to use a pitfall trap.
The Agnaktor is quite aggressive, quickly attacking and challenging hunters or other monsters that wander into its territory. This mainly happens because the Agnaktor has no natural predators. At times, Ratholos and Deviljho can wander into the Volcano and pose somewhat of a threat. However, due to its territorial advantage, it can still best them due to its ability to come up from under them, and use its powerful heat beam.
Attacks and Battle Tactics:
First of all I would like to mention the fact that just about any movement produced by the Agnaktor can produce minor scratch damage to hunters. With this mentioned, when the Agnaktor turns, his tail can damage hunters so be aware of that. While he is in rage mode, he moves faster and deals more damage per attack. If there is anything worth mentioning about an attack while he’s in rage mode, it will be mentioned.
The first attack, which should be quite familiar, is the Sliding Charge. This slide is very similar to the one that the Lagiacrus does when on land. When you’re in front of him the best thing to do is to roll/dive to the sides or blocking if possible. However, if you are too close try to dive because if you roll, the hit box will still get you. The best way to avoid this attack in general is to constantly stay on the move in a circular manner around the Agnaktor.
Another move that can be quite devastating if you still have low defense armor is the Agnaktor’s Hip Check. The Agnaktor will turn towards his right side (his left side facing you) and slide his body towards the hunter. When he turns, he does not center his body so I have found it quite effective to when standing in front of him to run and roll/dive to your left because his hit box extends further to the right. If you are standing near the tip of his tail while he is turned, you can also roll to the side as the hit box ends just about there. This attack can also be blocked and, just like the slide, is easily avoidable as long as you are moving in a circular motion around him.
![]() The Agnaktor’s Body Slam is another move with interesting characteristics. While he is preparing for the slam, he can turn slightly to make contact with the hunter. If hit with the body slam while his lava is still soft, you will be sent flying back and you will have fireblight. The slam also has a quake area of effect that will make your hunter stumble. You are very close to him and you have a weapon that can block, that’s your best bet. If not, then attempt to move away quickly because the range of the attack is actually quite short. The most you would have to worry about at that point is the tremor which does no damage. The best way to avoid this attack all together is to stay at a distance of approximately his neck length while circling around him.
The Agnaktor’s Body Slam is another move with interesting characteristics. While he is preparing for the slam, he can turn slightly to make contact with the hunter. If hit with the body slam while his lava is still soft, you will be sent flying back and you will have fireblight. The slam also has a quake area of effect that will make your hunter stumble. You are very close to him and you have a weapon that can block, that’s your best bet. If not, then attempt to move away quickly because the range of the attack is actually quite short. The most you would have to worry about at that point is the tremor which does no damage. The best way to avoid this attack all together is to stay at a distance of approximately his neck length while circling around him.
The Double Bite is the next move in his arsenal. He will lower his head and take two bites in while moving forward. The first bite will go towards your right and the second bite to your left. If you are at his sides when he does the double bite, his legs can still cause some minor damage to the hunter. If you are in front of the Agnaktor you can block this attack, or roll/dive. I recommend watching his bite animation and on the first bite that goes to the right, roll to the left and the legs and second bite will miss you. Minimizing the amount of standstill time in front of him is the best way to stay safe from the attack.
![]() The Quadruple Peck has a slow start up, but when in rage mode the attack is quite quick and can cause fireblight. The Agnaktor lifts his head back and pecks at the ground 4 times while moving forward. The pecks will begin to your right with the last peck ending to your left. If you are caught in front, I do not recommend that you block unless you are a Lancer with the Guard + skill as this attack can hit you up to 4 times. Your best bet is to quickly roll/dive to either the left or right depending on where his head is. If you are not in front, then you can pretty much attack his body freely. If you decide to attack the front legs, do so from the sides as if you do it from the front you will get hit. The best way to stay safe from this attack is to circle around the Agnaktor as usual.
The Quadruple Peck has a slow start up, but when in rage mode the attack is quite quick and can cause fireblight. The Agnaktor lifts his head back and pecks at the ground 4 times while moving forward. The pecks will begin to your right with the last peck ending to your left. If you are caught in front, I do not recommend that you block unless you are a Lancer with the Guard + skill as this attack can hit you up to 4 times. Your best bet is to quickly roll/dive to either the left or right depending on where his head is. If you are not in front, then you can pretty much attack his body freely. If you decide to attack the front legs, do so from the sides as if you do it from the front you will get hit. The best way to stay safe from this attack is to circle around the Agnaktor as usual.
![]() The Bite-Tail Swing is a move that can be quite tricky to inexperienced hunters as it is two back to back attacks that can cover quite a distance. The Agnaktor will first raise his head and swing around 180 degrees to your right and bite. Immediately after the bite, his tail will swing around and cover a little over 180 degrees and then return to where his head was before he swung it around. If the tail makes contact, fireblight will occur. The attack can be blocked with no problem and if you are standing directly in front of the Agnaktor, I recommend a diagonal roll to your right because you will roll through the bite and the tail will swing to your left rendering you safe from the tail. If you are not that close to him and you plan on running away, be mindful of the tail as it covers a wide radius and has tremendous reach.
The Bite-Tail Swing is a move that can be quite tricky to inexperienced hunters as it is two back to back attacks that can cover quite a distance. The Agnaktor will first raise his head and swing around 180 degrees to your right and bite. Immediately after the bite, his tail will swing around and cover a little over 180 degrees and then return to where his head was before he swung it around. If the tail makes contact, fireblight will occur. The attack can be blocked with no problem and if you are standing directly in front of the Agnaktor, I recommend a diagonal roll to your right because you will roll through the bite and the tail will swing to your left rendering you safe from the tail. If you are not that close to him and you plan on running away, be mindful of the tail as it covers a wide radius and has tremendous reach.
![]() The Agnaktor will at times Dig and Resurface. When he digs he slams his beak into the rock and damages close hunters as well as inflict fireblight. After he digs, he will resurface randomly around the map or directly under the hunter. When he resurfaces, he flies into the air and slams back down causing a quake effect and making your hunter tremble. The best way to avoid getting damaged during his dig is either blocking if possible, or rolling away from him. On the resurface, if he is under you then continue running and try to keep a good distance you aren’t damaged by his slam or affected by the tremor. The best tactic to avoid these moves all together is to maintain a medium distance from his front end and to constantly stay moving.
The Agnaktor will at times Dig and Resurface. When he digs he slams his beak into the rock and damages close hunters as well as inflict fireblight. After he digs, he will resurface randomly around the map or directly under the hunter. When he resurfaces, he flies into the air and slams back down causing a quake effect and making your hunter tremble. The best way to avoid getting damaged during his dig is either blocking if possible, or rolling away from him. On the resurface, if he is under you then continue running and try to keep a good distance you aren’t damaged by his slam or affected by the tremor. The best tactic to avoid these moves all together is to maintain a medium distance from his front end and to constantly stay moving.
![]() While the Agnaktor is underground, it will momentarily rise out and use a move known as the Semi-Underground Swim. This move is easily avoided because he usually appears at a distance and swims directly at you, and he can repeat it again like 2-3 times and can cause fireblight. Sometimes, he will try to predict where you are going and turn during the swim to try to get you during your evasion. However, the Agnaktor predicts this based on which way your hunter is facing right before he begins swimming towards you. This makes it extremely easy to dodge once you see he is turning because by simply turning around or stopping in your tracks he will miss because the Agnaktor will continue turning.
While the Agnaktor is underground, it will momentarily rise out and use a move known as the Semi-Underground Swim. This move is easily avoided because he usually appears at a distance and swims directly at you, and he can repeat it again like 2-3 times and can cause fireblight. Sometimes, he will try to predict where you are going and turn during the swim to try to get you during your evasion. However, the Agnaktor predicts this based on which way your hunter is facing right before he begins swimming towards you. This makes it extremely easy to dodge once you see he is turning because by simply turning around or stopping in your tracks he will miss because the Agnaktor will continue turning.
![]() Sometimes the Agnaktor will not use the swim and instead he will use his Spinning Dolphin Jump. This attack will only target one player at a time and will cause fireblight. He can use the move up to 3 times in a row, but when he’s in rage mode he can use it up to 5 times in a row. Right before this attack is executed, you will notice the ground glow and his beak spinning out of the ground. This gives you a fraction of time to react by running in a circular motion from his position and rolling as soon as he arcs out of the ground. If you dive you WILL be hit by his second jump so do not dive. The Agnaktor can link the dolphin jump with the swim move, or vice versa, at random so keep an eye out for that.
Sometimes the Agnaktor will not use the swim and instead he will use his Spinning Dolphin Jump. This attack will only target one player at a time and will cause fireblight. He can use the move up to 3 times in a row, but when he’s in rage mode he can use it up to 5 times in a row. Right before this attack is executed, you will notice the ground glow and his beak spinning out of the ground. This gives you a fraction of time to react by running in a circular motion from his position and rolling as soon as he arcs out of the ground. If you dive you WILL be hit by his second jump so do not dive. The Agnaktor can link the dolphin jump with the swim move, or vice versa, at random so keep an eye out for that.
![]() The Agnaktor will also use his signature Heat Beam. He starts it by snapping his beak several times as a warning and then launches the beam. This does massive damage if you have weak armor, or armor with bad fire resistance. If you are directly in front of him, because of the time he takes to actually fire his beam, it can be easily avoided by running to either the right or left side. DO NOT attempt to run in the same direction he is looking, or try to block it. The beam’s range is as far as the eye can see and it will go through any block. The only way to block it is with the Guard Boost skill. The Agnaktor can also use his heat beam while he is semi-submerged underground. He will usually do it in three forms. The first is a vertical beam that starts from the ground and moves into the air that’s quickly followed by a horizontal 180 degree sweep starting from you right. The next two are different forms of each other; a short range or long range 360 spin. During the long range spin, unless you are very close to him, the best thing to do is dive. During the short range spin, you need to make sure you are either very close or far from him. If you are at about a medium range, that beam will hit you.
The Agnaktor will also use his signature Heat Beam. He starts it by snapping his beak several times as a warning and then launches the beam. This does massive damage if you have weak armor, or armor with bad fire resistance. If you are directly in front of him, because of the time he takes to actually fire his beam, it can be easily avoided by running to either the right or left side. DO NOT attempt to run in the same direction he is looking, or try to block it. The beam’s range is as far as the eye can see and it will go through any block. The only way to block it is with the Guard Boost skill. The Agnaktor can also use his heat beam while he is semi-submerged underground. He will usually do it in three forms. The first is a vertical beam that starts from the ground and moves into the air that’s quickly followed by a horizontal 180 degree sweep starting from you right. The next two are different forms of each other; a short range or long range 360 spin. During the long range spin, unless you are very close to him, the best thing to do is dive. During the short range spin, you need to make sure you are either very close or far from him. If you are at about a medium range, that beam will hit you.
The Agnaktor’s Roar is like most large monster roars and does no damage. It temporarily stuns your hunter by making his cover his ears unless you have the Earplugs skill.
Breakable Parts:
Just about every part of the Agnaktor can be broken and his tail cut off. His beak, fin, and four legs can be damaged by applying enough damage to them. This picture will serve as a great reference to see what the parts look like when they are normal and when they are broken.
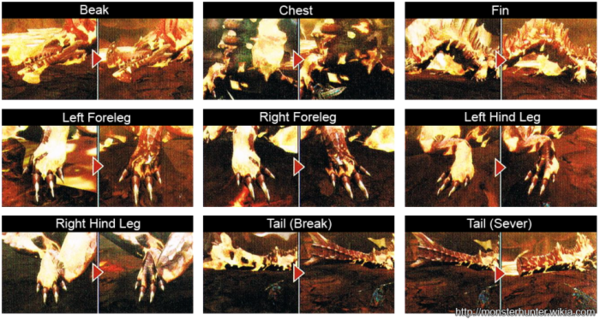
( Images courtesy of www.monsterhunter.wikia.com )
Damage, Ailments, & Item Analysis:
Here I will show you some images and tables that will describe cutting and impact weak points, elemental weaknesses, and item effectiveness.
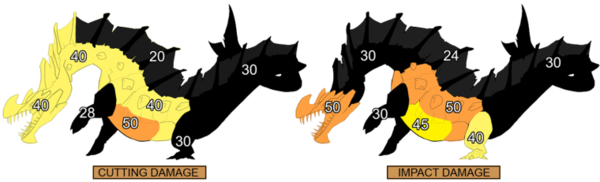
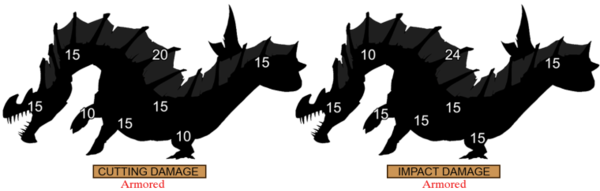
( Image courtesy of www.monsterhunter.wikia.com member Inkoseh )
|
Element Damage (Armored) |
|||||
|
Hitzone |
|
|
|
|
|
|
Head |
0 |
25 |
10 |
15 |
5 |
|
Neck |
0 |
15 |
5 |
10 |
5 |
|
Chest |
0 |
25 |
0 |
10 |
10 |
|
Body |
0 |
20 |
0 |
15 |
5 |
|
Front Legs |
0 |
5 |
0 |
15 |
5 |
|
Back Legs |
0 |
20 |
0 |
10 |
5 |
|
Fin |
0 |
20 |
5 |
10 |
15 |
|
Tail |
0 |
15 |
5 |
20 |
5 |
|
||||||||||||||||||||||||||||||||||||||||||||||||||||||||||||
|
Status Effect |
|||||
|
Poison |
Paralysis |
Sleep |
Fatigue |
Stun |
|
|
Initial Tolerance |
180 |
200 |
180 |
180 |
200 |
|
Tolerance Increase |
+120 (660) |
+100 (600) |
+120 (660) |
+75 (480) |
+100 (600) |
|
Tolerance Recovery |
5/ 10 sec |
5/ 10 sec |
5/ 10 sec |
5/ 10 sec |
5/ 10 sec |
|
Duration |
60 sec |
10 sec |
30 sec |
— |
10 sec |
|
Damage |
150 + 5 |
— |
— |
200 |
— |
|
Item Effect |
|||||
|
Item Name |
Able |
Effectiveness |
Duration |
Notes |
|
|
1st time |
2nd time |
||||
|
Pitfall Trap |
Y |
1/3 Stars |
0:20 |
-5 seconds each time |
Using a pitfall trap will cause Agnaktor to be half submerged in lava. This softens his armor while trapped. |
|
Shock Trap |
Y |
2/3 Stars |
|||
|
Flash Bomb |
Y |
2/3 Stars |
If a flash bomb is thrown in Agnaktor’s face during its 360 fire beam, it will become stunned and will crawl out of the ground. |
||
|
Sonic Bomb |
Y |
2/3 Stars |
Works only when Agnaktor is burrowing through rock. Doesn’t work when he’s in Rage. |
||
|
Dung Bomb |
Y |
2/3 Stars |
|||
|
Meat |
N |
N/A |
|||
(All tables courtesy of www.monsterhunter.wikia.com)
Materials and Carve Rates:
|
Picture |
Name |
Rarity |
Value |
Item Description |
|
|
|
Agnaktor Scale |
4 |
380z |
This scale is a blazing hue, but don’t get too fired up; it’s not worth that much. |
|
|
|
Agnaktor Shell |
4 |
460z |
Turns a vivid red during crafting. Lightweight and incredibly heat resistant. |
|
|
|
Agnaktor Hide |
4 |
580z |
Curious hide that’s both supple and highly resistant, but not necessarily strong. |
|
|
|
Agnaktor Fin |
4 |
780z |
One of many fin-like pinnae found on Agnaktor. It works as a ship part. |
|
|
|
Agnaktor Tail |
5 |
820z |
A tail carved from an Agnaktor. The going price is low due to lack of demand. |
|
|
|
Agnaktor Claw |
4 |
1080z |
This claw is powerful, AND it just came out of scalding hot magma. Careful! |
|
|
|
Agnaktor Beak |
4 |
1380z |
An Agnaktor’s distinguishing beak, which allows it to tunnel beneath the earth. |
|
|
|
AgnaktorCarapace |
4 |
1260z |
Turns a vivid red during crafting. Lightweight and incredibly heat resistant. |
|
|
|
Agnaktor Hide+ |
4 |
1420z |
Curious hide that’s both supple and highly resistant, but not necessarily strong. |
|
|
|
Agnaktor Fin+ |
4 |
1780z |
One of many fin-like pinnae found on Agnaktor. It works as a ship part. |
|
|
|
Agnaktor Claw+ |
4 |
2040z |
This claw is powerful, AND it just came out of scalding hot magma. Careful! |
Low Rank:
|
|
|
|
||||||||||||||||||||||||||||||||||||||||||||||||||||||||||||||||||||||||||||||||||||||||||||||||||||||||||||||||||||||
|
|
|||||||||||||||||||||||||||||||||||||||||||||||||||||||||||||||||||||||||||||||||||||||||||||||||||||||||||||||||||||||||
High Rank:
|
|
|
|
|
|
|||||||||||||||||||||||||||||||||||||||||||||||||||||||||||||||||||||||||||||||||||||||||||||||||||||||||||||||||||||||||||||||||||||||||||||||||||||||||||||||||||||||||
(All tables in this section provided by www.monsterhunter.wikia.com)
Notes:
When hunting an Agnaktor, there are a few things to keep in mind in order to maximize your success during the hunt. I will list a couple of these tips in this section.
- When the Agnaktor is low on stamina his mouth will water like most monsters and he will move slower. He will also not be able to produce his heat beam. To recover stamina he will go to Area 5 of the Volcano to feast on a Rhenoplos.
- When he’s weak, the Agnaktor will limp and escape to Area 10 of the Volcano to sleep.
- The instant after he digs he is susceptible to a sonic bomb. This will trap him in the ground much like a Diablos. However, this will not work while he is in rage mode.
- If he is flash bombed while partially underground during his heat beam he will crawl back out instead of staying stuck.
Credits:
Most of the information on this article is based off of my own experience. I have also used some info from www.monsterhunter.wikia.com , which is updated constantly by fellow hunters. The images and tables in the “Damage, Ailments, & Item Analysis” were made by a fellow member of the Wikia named Inkoseh.
Hope you enjoyed the article and that it helped improve your hunts with the Agnaktor!
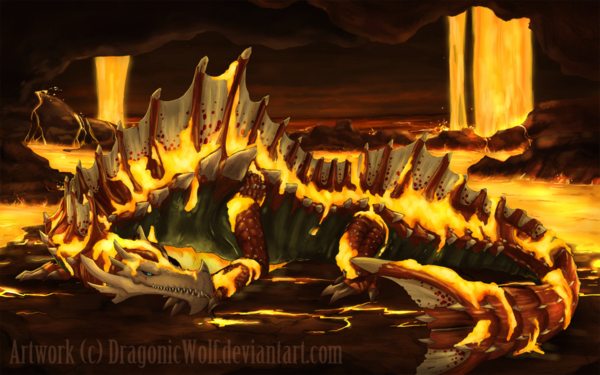
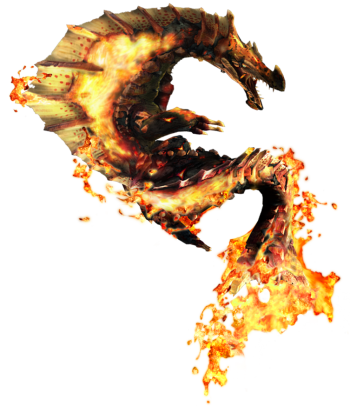
( Image courtesy of DragonicWolf.devianart.com )
-
Brands:Tags:
-

Loading...
Platforms:
