15 tips on playing the Monster Hunter: World Beta
Dec 08, 2017 // Yuri Araujo
Greetings hunters! The Monster Hunter: World PS4 Beta is happening this weekend— you can download it here: US / EU —and we have plenty of information to help you dive into the game. There is a quick guide available on the website , but we also have even more helpful tips below!
Foreword
It’s an exciting time to finally have players get their hands on the game ahead of its full console release on January 26, but before we dive in, I just wanted to emphasize that some of the contents of this Beta may differ from the full game. Most notably, this Beta is segmented into three standalone quests that last up to 20 minutes, and that’s quite different from how they’ll come in the main game: they can last up to 50 minutes and may come up organically in your journey or be acquired by NPCs in the Research Commission headquarters of Astera. And of course, the main game loop we’re saving just for the full game: after each quest, you’ll get to carve and collect monster parts that can be fashioned into powerful weapons and armor that will aid you in taking down the next big monster in line.
And one final note before jumping in: these 15 tips are geared towards folks that have little to no familiarity with the Monster Hunter series (welcome, BTW!) or have taken a long break from their hunting duties (welcome back, BTW!). If you’re a veteran hunter who’s been keeping up with recent titles, a lot of the core hunting principals will still apply to Monster Hunter: World, so I encourage taking your time to explore and uncover the new gameplay systems as you play. Now without further ado, here are 15 tips on playing the Monster Hunter: World Beta:
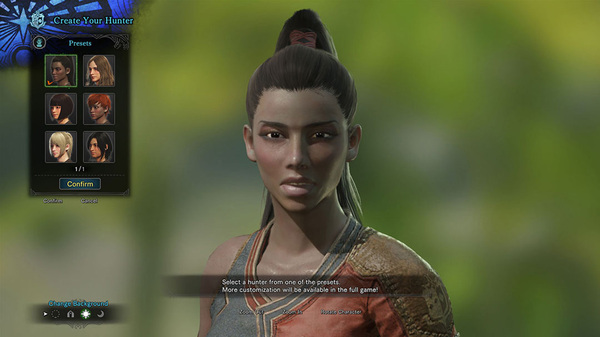
1. Save time on character creation
You want to get straight to the action and we know this, so for the Beta we’ve limited the character creator to 6 presets per gender, and 4 presets for your Palico (your AI-controlled Felyne companion). In the full game, you’ll have access to a vast customization system, but for now we’re even letting you change your appearance before each quest.
2. Find a hunting party
Sure, you can go on a Single Player session and hunt solo, but 3/4 of the fun of Monster Hunter is in being 1/4 of a 4-player hunting party and working together to take down a fearsome monster. In this Beta, you can choose the quick Matchmake option to be paired with other hunters online or create your own Private Session and invite some friends. Just have them enter the auto-generated 16-digit session ID in the Search by Quest ID field and you’ll be hunting together in no time. Also worth noting the full game features even more ways to connect with other people, such as 16 player lobbies and friend invites.
3. Test drive any weapon type at your local Training Room today!
We’ve all been there: it’s your first hunt and your parents are live-tweeting the whole thing and your crush is watching. Yep, the pressure is on and you can’t afford any mistakes. Good thing you’ve taken the time to master each of the 14 unique weapon types in the game, right? No? Okay, then smoothly head over to the all-new Training Room and tell them you need to “try out a new strategy you just thought of.” You’ll be off the hook and have the perfect arena for trying out all available weapon types as well as your Slinger , environmental tools and more. And the best part is all of the items and ammunition you use in the Training Room will be reset when you go into an actual quest.
4. Eat, drink and be ready
Each quest starts with you and your pals at one of the 4 Base Camps present in each environment—and you can even start the quest at a different camp from your hunting pals, if you so choose. These enclosed spaces are the only areas where you’re truly safe from monsters in each map, but they also offer a variety of options for you to get ready for the hunt. There you can eat a meal at the Canteen to boost your stats and replenish your stamina, collect useful items from the blue Supply Box, such as First-Aid Meds you can drink to restore health, and even go inside the Tent to change up your weapons and armor to be ready for whatever challenges come your way.
5. Check your Map! And get to know your surroundings
10 out 10 cartographers agree maps are useful for not getting lost, so we’re giving one to every hunter out there… we’re giving you a Map, not a cartographer. Yeah, I’m sorry if I got your hopes up for that personal cartographer, but hey, the Map in Monster Hunter: World is pretty good: it can track your location and your hunting pals’ locations, mark items you can gather, useful environmental elements you can interact with, and even keep tabs on monsters (after you find them)! And if you need to make a quick trip back to any Base Camp, you can summon your personal Wingdrake for Fast Travel by simply selecting it on the Map, as long as you’re not in combat.
5 ½. Check your Mini-Map! And get to know your immediate surroundings
Have you ever tried opening up a full-sized Map during combat? Yep; bad news. That’s why we’ve also packed you a useful Mini-Map that’s always on the bottom left of the screen. It’s just like the normal full-sized Map, but Mini-sized. And while the scope is more limited, we’ve actually added some very useful bits of info on the ring surrounding the Mini-Map. So look out for the following clue:
- No ring = you’re in the clear;
- Purple = stealth. You’re out of sight, but monsters are looking for you… be very, very quiet;
- Red = combat. Fight!
Here’s a fun statistic: 100% of hunters faint when their health reaches zero. It’s a rather alarming data point, but there’s actually a very easy way to prevent this: mind your Health Bar, and other UI elements on screen.
- The green gauge is the Health Bar in question; keep an eye on it and stay alive;
- The yellow gauge beneath it is the Stamina Bar; keep it full (food!) to be able to Dash and execute specific attacks; you can’t run indefinitely in real-life either so mind the gauge!
- The clock to the left of these two gauges is your quest timer; it moves once every 5 minutes;
- Beneath the clock is a space dedicated to showing your teammates’ health bars and general status. Use this info to keep tabs on them and use the occasional Lifepowder to heal the whole group of nearby players;
- And beneath the Stamina Bar is another contextual space that changes depending on the weapon you have equipped…
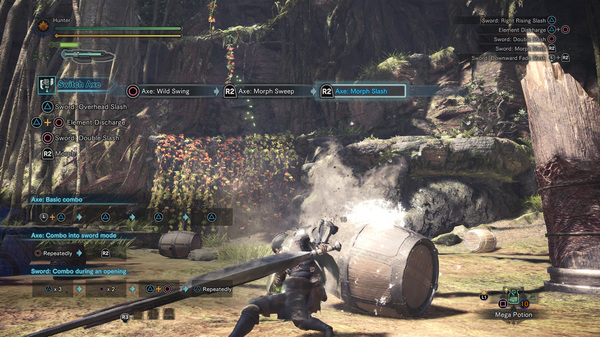
7. Stay sharp
Just like real-life, cutting tools will eventually become dull over time, leading to serious consequences. Remember that time at dinner when you tried to cut a steak with a dull knife and the knife bounced back making you fall off your chair, leaving you wide open for a counter-attack? Yep, same thing can happen in Monster Hunter: World; so if you pick any of the close range weapons (swords, axes, glaives, lances and hammers), keep an eye on your Sharpness Gauge and use Whetstones to maintain it at max level: green.
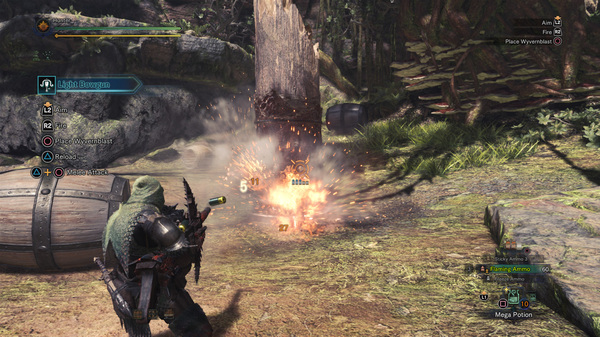
8. Reckon your range
If you prefer keeping a safe distance between you and your target—a smart move for new hunters, if you ask me—just remember to be mindful about the range of each ammo type. Spread shots excel at closer ranges while piercing ammo does best from farther away. You can see your selection on the bottom right corner of the screen, near the item wheel and I definitely recommend taking each ammo type or arrow coating for a spin in the Training Room so you can really see what they feel like. Look out for those Damage Indicators to help indicate if you’re nearing those optimal ranges.
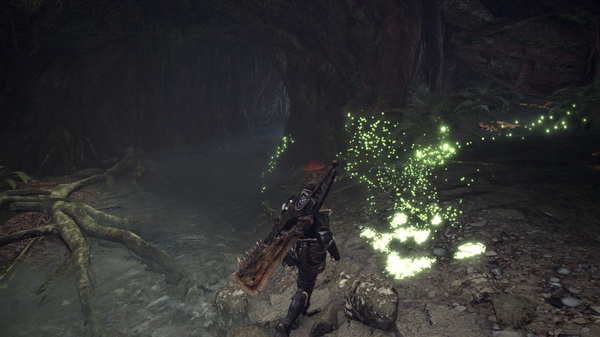
9. Trust your Scoutfly
Monster Hunter: World brings us all to a new world filled with wonder, danger and places to explore. Even with a handy map, it can be quite easy to get lost and miss out on the best part of the game: hunting monsters. So why not trust your friendly Scoutfly , who clearly knows their way around? Of course, the Scoutfly have a clear advantage here since they can track things by smell, so they can point to Monster Tracks, Items , Interactive Elements and even Slinger Ammo that are beyond our current field of view! Next time you see a green mist effect fly from your hunter, just stop and take a look around; it might be pointing to the exact thing you’re looking for.
Quick note: the Scoutflies are actually living organisms and will shyly run back to their cage if they sense danger. So if you notice they’re not being helpful, check the ring around the Mini-Map; you might be in combat mode.
10. Load up your Slinger
Every hunter in the new world is equipped with one of these versatile and reliable projectile tossing apparatuses. But to make the most out of this hunting tool you need to first gather up said projectile to be tossed. As stated in tip #9, your Scoutfly can be of great use in finding and marking some Slinger Ammo for you, so do keep an eye out for those. Each ammo type carries different properties and are made for different uses, so I encourage experimenting in the field. Just be mindful that you can only carry one ammo type at a time and will drop the currently equipped projectile upon picking up a new one. The only exceptions are throwing knives and capture nets, which instead take up space in your inventory.
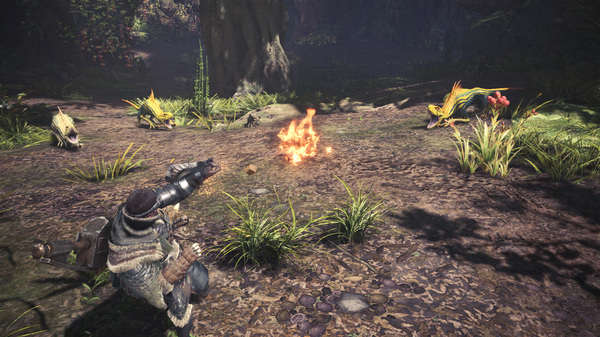
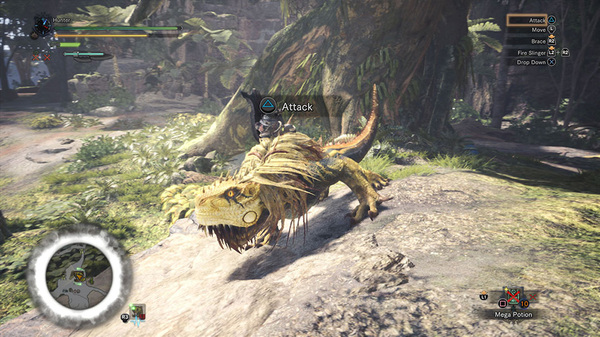
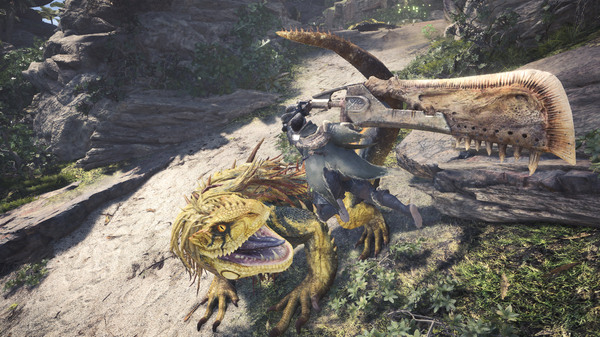
11. Great Jagras loves to eat
This beginner-friendly foe is the leader of the packs of small Jagras you’ll see roaming around the Ancient Forest. Chances are you’ll run into it during one of its meals, and it’ll be very obvious to tell once it’s done eating. Not only is this a neat aspect of the ecosystem, it’s actually also kind of like real life. You know how painful it can be if something hits you in your gut right after you ate something? Same goes for the Great Jagras; its enlarged stomach area becomes a weak point. So give it a couple of hits and watch those Damage Numbers go from white (regular) to yellow (higher) damaging values.
Great Jagras tracks include footprints , skid marks, and leftover carcasses .
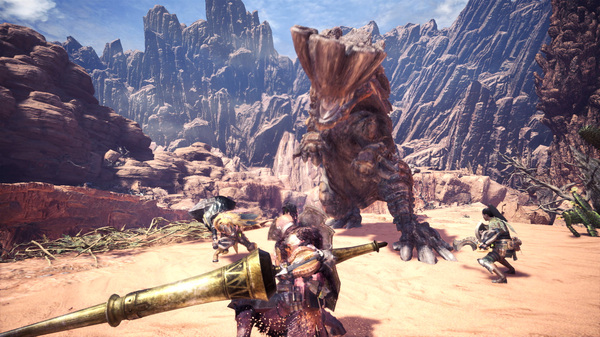
12. Barroth uses its head to attack
The intermediate quest in the menu is the headstrong Barroth in the Wildspire Waste. This brute wyvern will often be found coated in mud to protect itself from intense heat and incoming attacks, and its main offensive strategy is using its head for charging attacks. But it doesn’t always think twice before charging at you… so you might be able to use this to your advantage…?
Barroth tracks include footprints , broken anthills, and mud tracks (also found on walls).
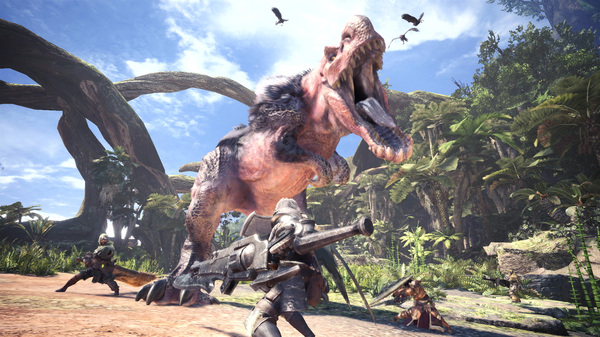
13. Beware the Anjanath
You’ve mastered the environmental interactions in the Ancient Forest and learned as much as you could about brute wyverns from the Barroth; now it’s time to put it all to the test in a battle against the mighty Anjanath! This beast of a monster is not only relentless in its attacks, but also brings in new moves and strategies to the mix. Watch out for tail swipes, constricting bites, unpredictable jumps and fire.
Anjanath tracks include footprints , carcasses , and mucus (also found on walls).
14. Hunt again
After you’ve completed your first quest (or each quest once), you might think to yourself: “well that was neat!” and immediately walk away. Well, what if I told you it gets better? We’ve said it before: Monster Hunter: World features a living, breathing ecosystem full of dynamic, natural and unexpected behaviors from its inhabitants. And we mean it. Of course, the full game will give you a very clear motivation to re-embark on the same quest—gear crafting materials!—but for this Beta I encourage you to play each quest once more if only to see the promise of this ever-changing ecosystem. And hey, maybe you can switch things up to and pick a different weapon type!
15. Join a random group
Okay, I think we’ve covered as much ground as we could about the contents of the Monster Hunter: World Beta, so I wanted to leave one final tip on an aspect that exists a degree beyond the Beta itself: playing with a random group online. I’ve been playing Monster Hunter for over a decade now, and while it’s incredibly fun to play with friends, I realized I’ve also learned so much from joining new hunting parties and watching and adapting to their strategies. So whether you’re planning to tackle the Beta with a full party or not, I recommend taking on at least one quest with a group of strangers. Just remember to be nice and watch each other’s backs.
Happy Hunting!
-
Brands:Tags:
-

Loading...
Platforms:
